

Manage App Settings
Open an App and select Settings.
Understand permissions
Section titled “Understand permissions”- Team owners and admins can change the App avatar, name, and authoritative YAML.
- Developers can view and download the authoritative YAML but can’t change it.
- Billing members can view the App identity but don’t see the YAML.
- The Transfer entry point is visible to Team members, but the transfer operation enforces its own role requirements.
Request tracing is a focused exception to general YAML editing permissions: owners, admins, and developers can change it from Diagnostics, while billing members can view its state. See Trace requests.
Change the App avatar
Section titled “Change the App avatar”Under General:
- Select the current avatar.
- Upload the replacement.
The avatar is saved when the upload completes. It doesn’t depend on the Save changes action for the App name.
Change the App name
Section titled “Change the App name”- Enter an App name of up to 100 characters.
- Select Save changes.
The portal derives the readable App URL from the name. Renaming the App can change that URL; an old App link redirects to the current URL.
Clearing the name restores the generated tenant-<id> name. There is no
separate editable URL-slug field.
Review the authoritative YAML
Section titled “Review the authoritative YAML”The Configuration section shows the complete authoritative App YAML at
.synsmarts/<app-id>.yaml, its current state, and a shortened content revision.
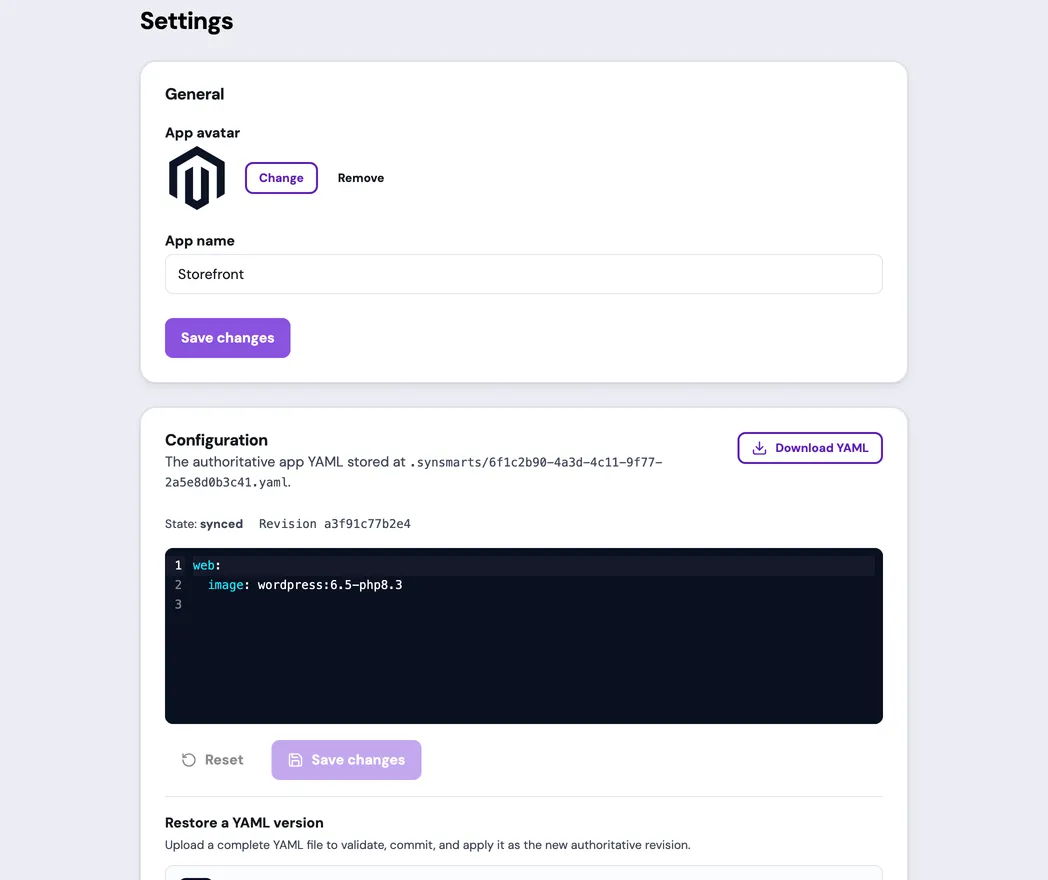
Select Download YAML to download the exact version currently shown. Secret values aren’t stored in this file; supported settings refer to secrets rather than containing them.
Edit and apply YAML
Section titled “Edit and apply YAML”Team owners and admins can edit the YAML:
- Make the required change in the editor.
- Select Save changes.
- Review the warning that affected services may restart and the App may be briefly unavailable.
- Select Save and apply.
- Keep the page open until the operation reaches a final result.
The portal validates the YAML before saving it. Correct every reported field error before trying again.
The result can report:
- the YAML already matched the authoritative configuration;
- the YAML was saved and no runtime change was required;
- the YAML was saved and applied;
- the YAML was saved and is queued behind recovery or another App change;
- the YAML was saved while a newer App change was already applying and will be applied automatically afterward;
- the YAML was saved but couldn’t be applied; or
- the YAML couldn’t be saved or applied, so authority is unchanged.
If status is temporarily unavailable, select Retry status before leaving the page.
Resolve a revision conflict
Section titled “Resolve a revision conflict”The editor and uploaded restore file are tied to the revision that was loaded when editing began.
If another App change updates the authoritative YAML:
- select Reset to latest before saving an edited draft; or
- review the latest revision and choose the restore file again.
This prevents an older edit from silently overwriting a newer App change.
Restore a YAML version
Section titled “Restore a YAML version”Restoring YAML replaces the current desired configuration with the uploaded file as a new authoritative revision.
- Under Restore a YAML version, select Choose file.
- Choose a complete
.yamlor.ymlfile for this App. - Select Restore YAML.
- Review the restart warning.
- Select Restore and apply.
- Keep the page open until the operation reaches a final result.
If validation fails, correct the uploaded file and choose it again. If the authoritative revision changed after file selection, load the latest revision before retrying.
Transfer the App
Section titled “Transfer the App”Under Danger zone, select Transfer to hand App access and future billing to another Team. Review Transfer an App before continuing.