

Manage SSH access
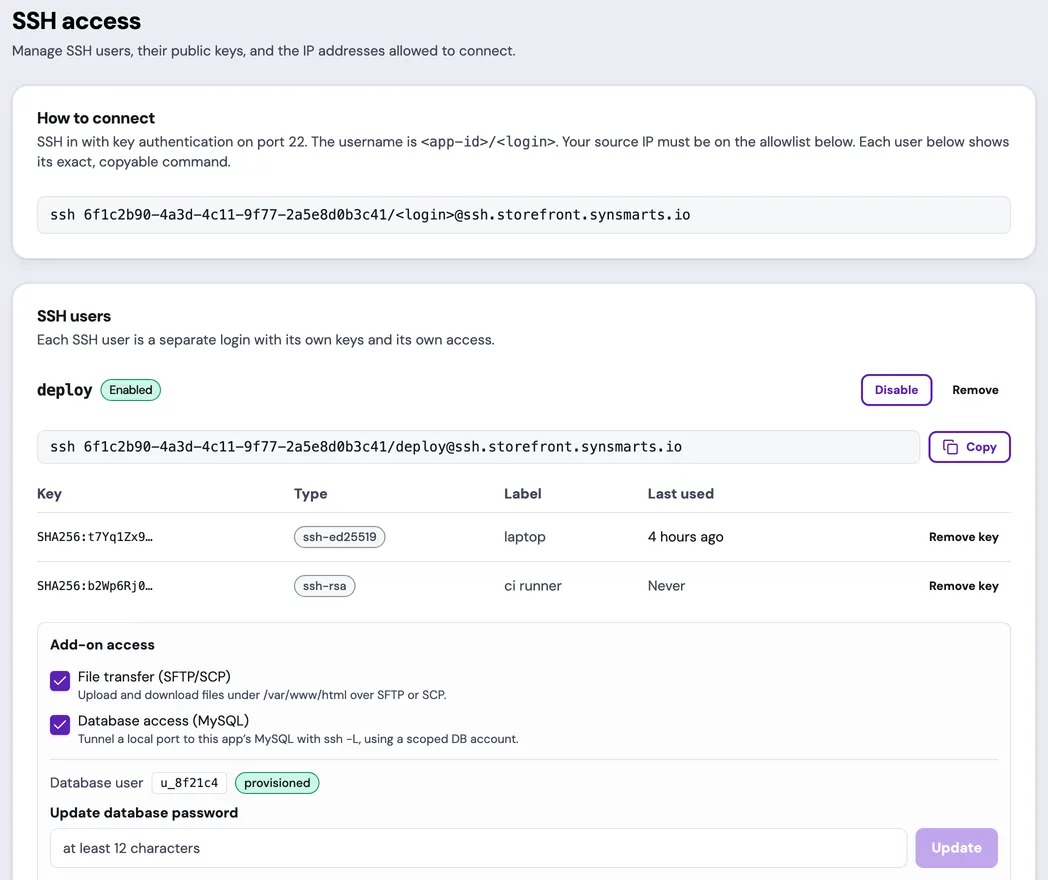
Open an App and select SSH. SSH access is configured per App and requires both a registered public key and an allowed source IP address. An App can have up to 32 SSH users.
Understand permissions
Section titled “Understand permissions”- Team owners and admins can manage every SSH user, key, add-on access grant, database account, and source IP range.
- Developers can add SSH users and manage only users they created, including enabling, disabling, removing, and changing those users’ keys.
- Developers can’t grant file transfer or database access and can’t change the App-wide IP allowlist.
- Billing members can review the page but can’t change SSH access.
If the portal can’t load your Team role, it hides management controls rather than offering actions that would fail.
Add a user and public key
Section titled “Add a user and public key”- Under Add an SSH user, enter a login name and select Add user.
- Open the new user’s card.
- Paste a complete OpenSSH public key under Add a public key.
- Add an optional label such as
laptoporworkstation. - Select Add key.
The card shows each key’s fingerprint and type. A user with no keys can’t authenticate. Public keys aren’t passwords, but you should still remove keys for lost or retired devices promptly.
Allow the source IP
Section titled “Allow the source IP”The IP allowlist applies to every SSH user on the App. Team owners and admins can add a single address or a CIDR range and attach a label.
IPv4 ranges must be /16 or narrower, and IPv6 ranges must be /48 or
narrower. Ranges that cover the entire internet are never accepted.
If Use my IP is available, verify the detected address before adding it. VPNs, mobile networks, and office gateways can change the public address. Add a replacement range before removing the one you are currently using so you don’t lock yourself out.
Connect with the exact command
Section titled “Connect with the exact command”Use the copy action beside the SSH user to copy the current command. The portal provides the resolved App identifier, login name, and SSH host. Don’t reconstruct the command from the browser URL because the URL can contain an App slug while SSH authentication uses the resolved App identifier.
SSH uses public-key authentication on port 22. Before troubleshooting the client, confirm that the user is enabled, has a key, and your current source IP is covered by the allowlist.
The managed shell includes the synsmarts CLI and framework tools appropriate
for the App. See Use the synsmarts CLI, Operate
WordPress, or Operate
Magento.
Enable, disable, or remove a user
Section titled “Enable, disable, or remove a user”Select Disable to suspend a user without deleting their keys. Select Enable to restore access after reviewing the user’s keys and source ranges.
Removing a user deletes all of that user’s keys and revokes their add-on access. Removing the last key blocks only that user; removing the last IP range blocks every SSH user on the App.
Grant file transfer or database access
Section titled “Grant file transfer or database access”When these controls appear for your App, file transfer and database access are per-user grants and are off by default. Only Team owners and admins can change them.
- File transfer (SFTP/SCP) allows the user to upload and download files
under
/var/www/html, the writable workspace path. The first connection can take longer while the managed shell starts. - Database access (MySQL) allows an SSH local-forward connection to this App’s database using a platform-assigned, per-user database account.
After enabling MySQL access, wait for the database account to reach provisioned. Set a password between 12 and 256 characters, then select and save the schema privileges the user requires. The password is write-only: the portal reports whether one is set but never displays it. If you save no privileges, the account can connect but can’t read or write data.
Copy the assigned username from Database user. Open a local forward whose
requested destination port is 3306, for example:
ssh -N -L 13306:mysql:3306 <copied-SSH-target>Then connect the database client to 127.0.0.1:13306 with the assigned
username and the password you set. Set your client’s SSL/TLS mode to
Disabled. No certificate or TLS setup is required — the SSH tunnel already
encrypts and authenticates the connection, so a MySQL-layer certificate is
redundant. Leaving SSL enabled can also make some GUI clients (for example
TablePlus) fail to verify the App database’s internal certificate. The platform
derives the actual App database destination from the authenticated SSH user; it
doesn’t dial the client-supplied mysql hostname.
Password, privilege, and grant changes reconcile asynchronously. Wait for the account state or operation status to finish before testing the new access. If you lose the password, set a new one; it can’t be retrieved.
The scoped account isn’t the App’s database root account. Grant only the privileges required for the user’s task.
Remove access
Section titled “Remove access”Use the narrowest revocation that matches the situation:
- remove one key when a device is retired;
- disable a user when access may be restored later;
- remove a user when the identity should no longer exist;
- remove a source range when the network should no longer connect; or
- turn off an add-on grant when the user no longer needs file transfer or database access.
Destructive actions require confirmation. Revocation blocks new authentication after the authorization change is applied and terminates existing sessions and database forwards within the revocation interval.
For a suspected compromise, disable the user first, remove the affected key, and verify that a new connection is rejected. Contact support if an existing session remains active after the revocation has finished applying.