

Transfer an App
Open the App, select Settings, and select Transfer under Danger zone.
Team owners and admins can initiate an App transfer.
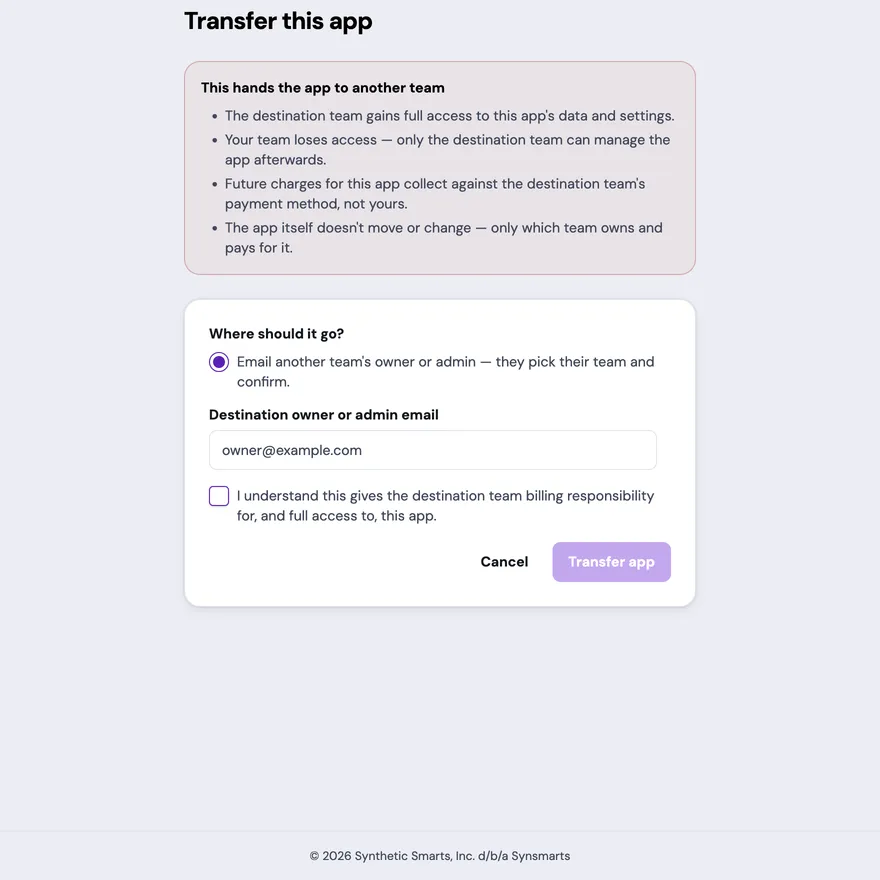
Understand what changes
Section titled “Understand what changes”A completed transfer changes which Team owns and pays for the App:
- the destination Team gains full access to the App data and settings;
- the source Team loses access;
- future charges use the destination Team’s default card; and
- the App ID, App data, and underlying App remain unchanged.
The transfer doesn’t re-create or migrate the App. It changes Team ownership and billing responsibility.
Confirm the warning before submitting either transfer path.
Transfer to another owner or admin
Section titled “Transfer to another owner or admin”Use the email path when the receiving Team belongs to another person:
- Select Email another team’s owner or admin.
- Enter the email address of an owner or admin at the destination.
- Confirm that the destination Team will receive billing responsibility and full App access.
- Select Transfer app.
The Transfer app control stays disabled until you confirm.
The portal emails an offer. Nothing moves until the addressed recipient signs in, chooses an eligible Team, and accepts. The offer expires after 72 hours.
Move the App between Teams you own
Section titled “Move the App between Teams you own”If you own both the current Team and another eligible Team, the portal also shows Move it to one of my own teams. Admin access to the current Team isn’t sufficient for this path.
- Select the same-owner option.
- Choose one of the destination Teams you own.
- Confirm the access and billing change.
- Select Transfer app.
This path doesn’t require a separate recipient acceptance. The transfer starts immediately and can take a moment to appear in the source and destination App lists.
The destination Team must have a saved card set as its default.
Complete two-factor authentication
Section titled “Complete two-factor authentication”The portal can require two-factor authentication when you initiate either transfer path. If it asks for step-up verification, enter the current 6-digit code from your authenticator app and select Verify and transfer.
Accept an emailed transfer
Section titled “Accept an emailed transfer”Open the acceptance link from the transfer email and sign in with the account that received it.
- Choose a Team that you own or administer.
- Review which Team loses access and which Team becomes responsible for future charges.
- If the Team has no default card, select Add a payment method and return to the acceptance link afterward.
- Confirm billing responsibility and full data access.
- Select Accept transfer.
The App can take a moment to appear in the destination Team’s App list.
If you don’t own or administer an eligible Team, create one or ask a Team owner to make you an admin before reopening the link.
If sign-in opens the portal home instead of the acceptance screen, reopen the latest transfer email after signing in.
Resolve transfer errors
Section titled “Resolve transfer errors”- Different recipient: sign in with the email address that received the offer, then open the link again.
- Invalid, malformed, missing, or expired link: reopen the complete link from the email or ask the sender to start a new transfer.
- No default card: add one to the destination Team before continuing.
- Destination Team is archived: restore the Team from account settings, then retry.
- Same Team selected: choose a Team other than the current owner.
- Transfer already pending: wait for the existing offer to complete or expire before starting another.
- App not found or access removed: return to the source Team’s App list and confirm that the App still exists and that you have access.