

Review App Overview
Open an App and select Overview.
Any Team member with access to the App can review Overview. Failed-App recovery actions are restricted to the Team owner.
Check setup progress
Section titled “Check setup progress”While a new or retried App is being set up, Overview shows the current setup stage in a live checklist. Keep the page open or return later; it updates automatically and changes to the App details when setup completes.
If setup fails before the App details are available, Overview shows the failed setup state instead of reporting that the App is missing. This early failure doesn’t have self-service retry or delete actions because the App record wasn’t created. Contact support for recovery.
If setup reports complete but App details are still being created, Overview continues to show setup progress. This short transition doesn’t mean the App was lost.
Review App details
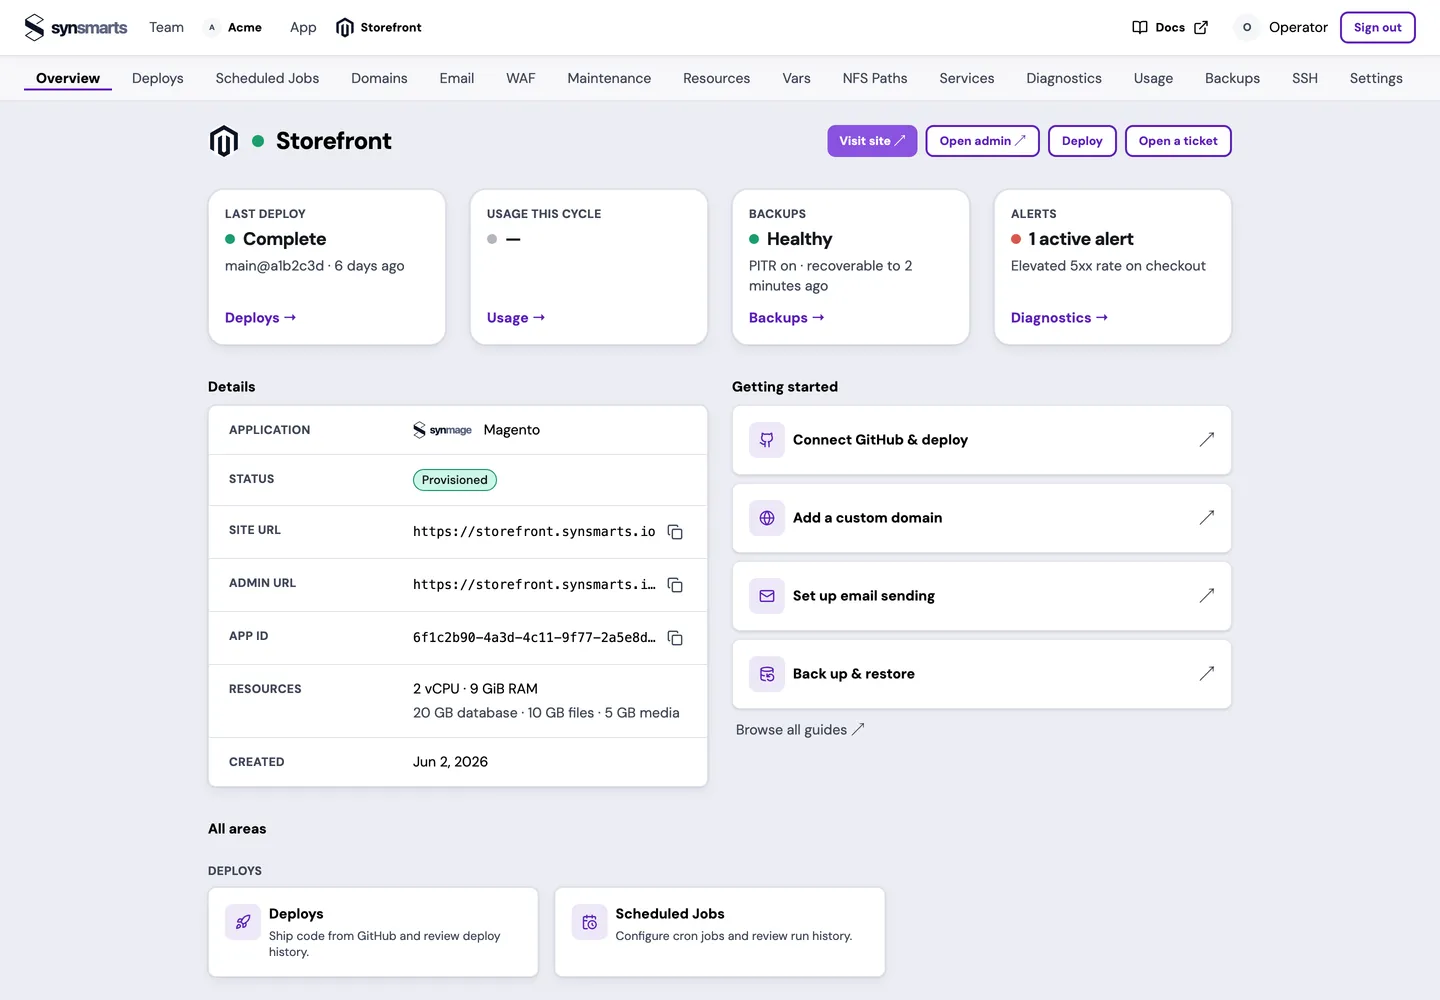
Section titled “Review App details”Overview is the read-only summary for the App:
- Application identifies the framework, such as WordPress or Magento.
- Status shows the current App state. Provisioned means setup completed; it doesn’t by itself prove that every customer journey works.
- Live app opens the customer-facing App URL in a new tab.
- Admin opens the framework administration URL when the application type provides one. The field is hidden when no supported admin URL is available.
- App ID is the stable identifier used by support and command-line operations. Use the copy action to copy the full value.
- Resources shows the purchased CPU, memory, and storage allocation. It intentionally shows the actual shape instead of a marketing tier name.
- Created shows when the App was created.
No resources allocated means the App doesn’t currently have a purchased resource shape. Resource details unavailable means Overview couldn’t derive a complete summary; reload the page and contact support if it persists.
Select Open a ticket to start a support request already scoped to this App.
Verify a newly provisioned App
Section titled “Verify a newly provisioned App”After the status becomes Provisioned:
- Open Live app and confirm the expected site loads over HTTPS.
- Open Admin when it is available and confirm you can reach the application login.
- Copy the App ID into any deployment, migration, or support notes.
- Review Resources and confirm the purchased CPU, memory, and storage allocation.
- Continue to connect a repository or review the App’s other portal screens.
Continue with the framework manual for WordPress Apps or Magento Apps.
Recover a failed App
Section titled “Recover a failed App”When Overview can show the App details and the App has a failed status, only the Team owner sees the recovery actions.
Retry setup
Section titled “Retry setup”Select Retry setup to run setup again for the same App. The App ID remains the same, and Overview returns to the live setup progress screen. The page continues polling until setup succeeds or fails again; a briefly stale failed status after selecting Retry doesn’t require a hard refresh.
Retry can be unavailable when the previous attempt is still closing, the retry limit was reached, or the App no longer has the record required to reconstruct setup. Use Delete app or contact support when the message says the App can’t be retried.
Delete the failed App
Section titled “Delete the failed App”Select Delete app, enter the displayed App name exactly, and confirm. Deletion starts immediately and removes the failed App after cleanup finishes.
Delete is available only to the Team owner. A failed App without a usable display name can’t be self-service deleted; contact support.
Resolve loading errors
Section titled “Resolve loading errors”- If Overview says the App couldn’t be loaded, select Try again.
- If Overview says the App couldn’t be found, select Back to apps and confirm that you opened the correct Team and App.
- If a completed retry still shows an old state after the page has had time to update, reload Overview once. If the state remains incorrect, open a support request.
To change the App name, avatar, or configuration, open App Settings.