

Manage scheduled jobs
Open an App and select Scheduled Jobs.
Only Team owners and admins can change scheduled-job definitions.
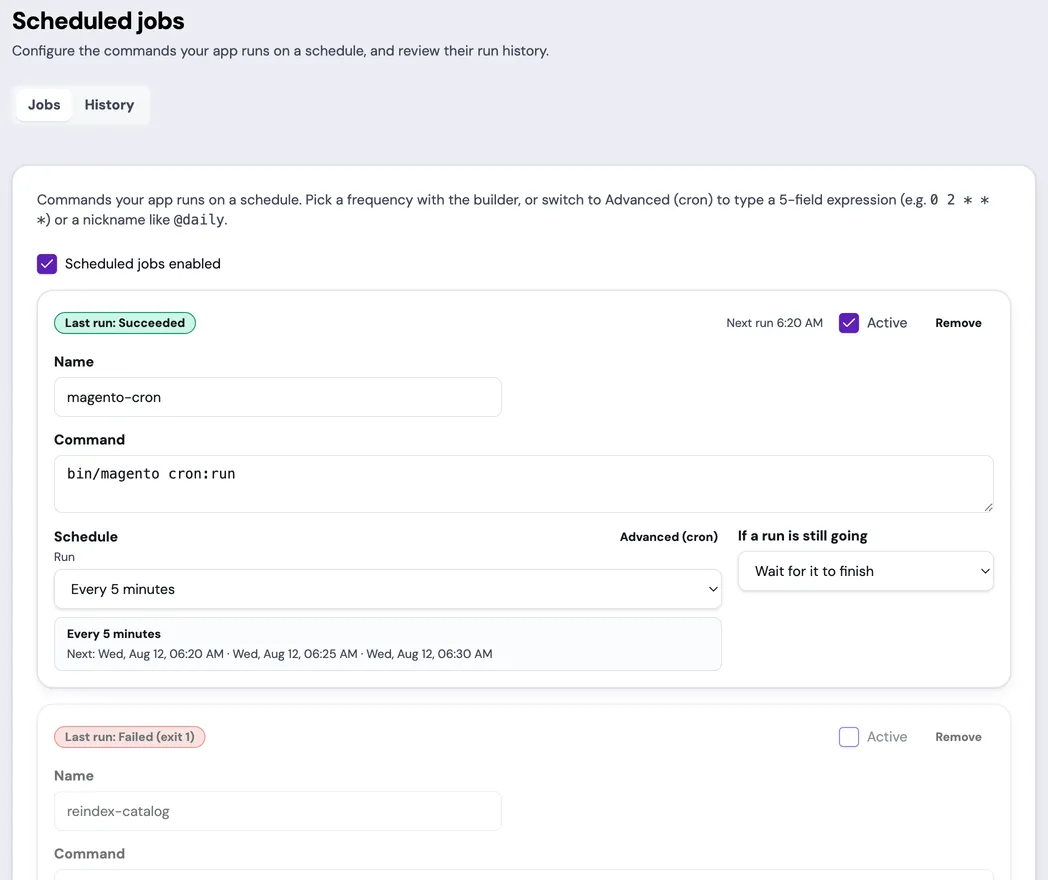
The Jobs tab shows the scheduler-wide control and each saved job’s latest result and next run; the History tab holds the run-history table.
Turn scheduled jobs on or off
Section titled “Turn scheduled jobs on or off”The Scheduled jobs enabled control pauses or resumes the scheduler for the App. Disabling it preserves every job definition.
Use the per-job Active control when you want to pause only one job. Pause a job instead of deleting it when you expect to use the same definition again.
Add or edit a job
Section titled “Add or edit a job”- Turn scheduled jobs on if the App doesn’t already use them.
- Select Add job.
- Enter a unique name and the command to run.
- Build a schedule with the schedule controls, or use the advanced cron field.
- Choose how overlapping runs are handled.
- Leave Active on unless the job should be created in a paused state.
- Save and confirm the apply.
An App can have up to 50 scheduled jobs.
Write a schedule
Section titled “Write a schedule”Advanced schedules use the standard five-field format:
minute hour day-of-month month day-of-weekFor example, 0 2 * * * runs daily at 2:00 AM. The portal also accepts common
nicknames such as @hourly, @daily, @weekly, @monthly, @yearly, and
@midnight.
@every and @reboot aren’t supported. Invalid schedules are rejected before
the change is saved.
Control overlapping runs
Section titled “Control overlapping runs”- Under If a run is still going, choose Wait for it to finish to prevent a new run from starting while the prior run is still active.
- Choose Run anyway (overlap) when overlapping runs are safe.
Use Wait for it to finish unless the command is safe to execute concurrently.
Apply scheduler changes
Section titled “Apply scheduler changes”Saving a changed job definition restarts the scheduled-job runner. The serving App remains online, but scheduled execution pauses briefly during the apply. The editor remains locked until the operation reaches a final result.
Follow the apply status and then verify the next expected run. A successful configuration apply proves that the schedule was accepted; it doesn’t prove that the command itself succeeds.
Review run history
Section titled “Review run history”Each job row shows its latest outcome. An active job also shows its next run time after the scheduler has calculated one.
Open the History tab to review:
- completed, failed, timed-out, terminated, and skipped runs;
- start time and duration;
- captured customer-safe output;
- the most recent 30 days, 90 days, or one year;
- one job or all jobs;
- newest or oldest results, with paginated results.
Captured output is limited, so use it for the immediate error or result rather than as the App’s primary log store. Run history is retained for one year.
For framework command examples and duplicate-scheduler precautions, see Operate WordPress or Operate Magento.
Understand job status
Section titled “Understand job status”- Succeeded means the command exited successfully.
Failed (exit N)means it returned a nonzero exit code.- Timed out means it exceeded its allowed runtime.
- Skipped means concurrency or scheduler rules prevented the run.
- Waiting for first run means the schedule hasn’t executed yet.
- Status unavailable means the portal couldn’t load current scheduler telemetry; it doesn’t change the saved definition.
Paused jobs and globally disabled scheduling don’t show a next run time.
Recover from a problem
Section titled “Recover from a problem”- Correct inline schedule, name, command, or concurrency errors before saving.
- If the revision is stale, select Load the latest and repeat the edit.
- If another App operation is active, wait for it to finish.
- If an apply fails or its status is unknown, select Load the latest before retrying.
- If run history can’t be loaded, retry the history request. The saved schedule continues to operate independently of the history view.