Manage App email
Open an App and select Email. Team owners and admins can change the sender and review delivery records. Developers and billing members can’t use these controls.
Understand the sender
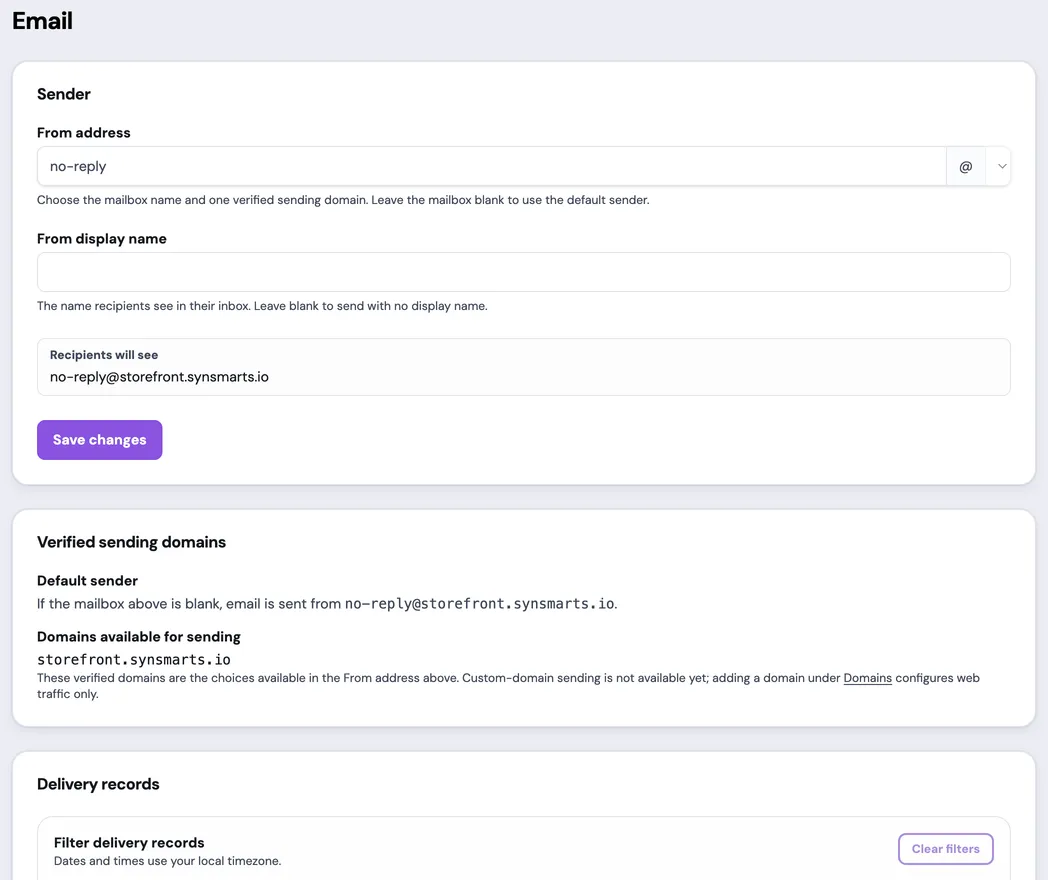
Section titled “Understand the sender”Email sent by WordPress or Magento uses the sender shown on this page, regardless of the From address originally requested by the App. If the original message used a different address, synsmarts preserves it as Reply-To when the message doesn’t already have one.
The sender has three parts:
- Mailbox is the text before
@, such asordersorsupport. - Verified sending domain is the domain after
@. Select one of the domains shown by the portal; free-form domains aren’t accepted. - From display name is the customer-facing name shown by email clients,
such as
Acme Store.
The preview shows the complete sender recipients will see. For example,
no-reply@storefront.synsmarts.io.
Change the sender
Section titled “Change the sender”- Enter the mailbox name in From address.
- Select one verified sending domain.
- Enter the optional From display name.
- Confirm the preview.
- Select Save changes.
- Keep the page open until it reports Changes applied.
The save status progresses from saving to applying because the authoritative App configuration is committed first and then rolled out. If another App change is already applying, the page reports that the latest configuration is queued behind it.
Leave the mailbox blank to use the Default sender shown under Verified sending domains. Leave the display name blank to send without a display name.
Understand verified sending domains
Section titled “Understand verified sending domains”The Verified sending domains card lists the domains this App can use for outbound email and shows its default sender. Every App receives a managed synsmarts sending domain. The From address editor accepts only the mailbox portion and one domain from this list.
Adding a domain under Domains configures web traffic. Customer-domain email sending isn’t available yet, so a site domain doesn’t automatically become a sending-domain choice.
Review delivery records
Section titled “Review delivery records”The Delivery records table shows recent outbound events with the local date and time, recipient, subject, and status. Use:
- Recipient and Subject to search text;
- Status to select one or more event types;
- Sent after and Sent before to limit the local date and time; and
- Clear filters to restore the complete recent list.
Statuses include send, delivery, bounce, complaint, reject, rendering failure, and delivery delay. A send event means the App handed the message to the email service; a delivery event confirms acceptance by the recipient’s mail server. A delivery event doesn’t prove the recipient opened the message.
If email isn’t sent
Section titled “If email isn’t sent”Confirm that the sender preview uses a listed verified domain and that the save finished applying. Then review the newest delivery record:
- Bounce or Complaint means the recipient or receiving system rejected or reported the message.
- Reject means the email service refused the message before delivery.
- Rendering failure means the message couldn’t be prepared for sending.
- Delivery delay means delivery is still being retried.
If no record appears after clearing the filters, retry the App action once. If it still produces no record, open a support request with the App name, recipient, subject, and approximate local send time.